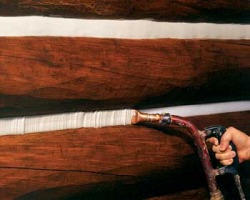
 Why do log homes continuously have rotten logs? So far, the best way to keep this problem from happening is by doing the process of chinking properly. It is to seal the elements permanently. The main reasons causing this problem is improper installation of caulking and improper application of chinking. What else can it do to your log homes? It can change the interior’s appearance in several ways. You can choose to intensify the brightness by using light colors, contrasting colors or same colors to blend with the stain. How to do the correct process of log home chinking?These steps will guide you in doing the process correctly. 1) The first thing to do is to clean the log’s surface and make sure it is dry. 2) Apply the chinking synthetic and maintain adhesion for about two inches. You can do this by applying first a bond breaker tape or backer rod. 3) Next is to apply the chinking product. You can use a caulking gun, grout bag, putty knife or spatula. 4) Lastly, use a trowel, putty knife, spatula or foam brush to smoothen the surface. Tip: Do the log chinking according to your capability and speed. If possible, the material must be tooled immediately after application. You can allow 15 to 30 minutes only for interval but no more than that or else it will skin over. Do you think you can do the process on your own? Only you can answer this question. Chinking can be considered an art; it must involve your interest, ability and speed. You must have the passion and determination to complete the project. When done properly, it will pay you in providing comfort, protection and increase the resale value of your log homes.
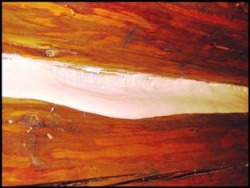
 More and more households are now building their houses using logs. With the advantages that you can get from it, it’s no surprise to see you next door neighbor having that kind of housing. The white part that you see in the middle of each log is what we call chinking. They are applied for different reasons such as to avoid insects and other unwanted pest from infesting your house. A lot of chinking can be done in the most creative way. Sometimes, it depends on how your logs are positioned as well. Chinking can also help you prevent unwanted dust from emerging since by chinking, you are covering the corner most of the logs. Most of the homeowners are asking the help of a professional to have a neat and clean look. There are other types of chinking that you can apply to your house if you want to see the gaps or cracks as chinking can be of the same color of the log. Chinking is not only applied to create a new house. It can also be used to repair old and damaged house or building. There are companies that offer that kind of service as well, making your house good as new. Its application can also result to the durability of the logs used in building your home since it serves as a protective layer to the exterior of the logs. If you are asking for the help of a contractor, make sure that you use the best of the product as well making sure that your contractor is applying it correctly. Thin and poor application could result to a painful headache as termite will slowly eat those parts of poor application. It is important to remember that chinking should be done carefully for a good and satisfactorily result.
 Imagine a textured material made up of mortar used to fixed the cracks in your log home. It’s traditionally made of lime, clay and sand but now they use an acrylic, flexible, elastic compound that can be easily stretched and contracted. That’s chinking. It’s used as a sealant for log homes. It is applied as a form of sealant adhesive so that your house will be protected from moisture and insect infiltrations and infestations. It also increases durability and enhances the beauty and quality of your home. It also lessens your house’s vulnerability from water leaks, moisture, molds, insects and decay. Chinking these days has evolved to keep up with the modern times and so as the tools that are used. And mainly the chinking material itself right now, instead of making it in the homes (even though there are still people who practice this) there are a couple of commercially prepared chinking materials. Now, these adhesives don’t just offer, flexibility and a lifetime guarantee but also ensures that their product doesn’t peel though time. It is also earth friendly and is capable to withstand any weather conditions. Furthermore, it is offered in different variations so that you will have a choice in selecting the best for your home. Chinking professionals offer a wide variety of services to their customers like caulking homes to keep it durable, insect free and moist free. They also do log repairing, insect elimination, finishing and staining. And of course, they will also give you additional tips regarding taking care of your wooden homes. Now, maintaining and preserving your own home through times wear and tear is a challenging and tough job considering that your house will go through a lot of seasonal changes and will face environmental, to insect damages, so who do you trust? Invest in chinking now and even for the professional help who’ll gladly do it for you.
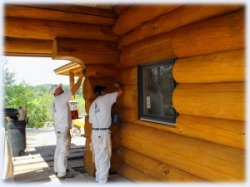 Chinking is not enough to renew your log cabin homes. One process that will aid you in protecting them is through staining. It will provide a protection for the wood to resist possible damages caused by too much exposure to sunlight and other extreme weather situations like heavy rain and strong wind.
Process of Staining before Log Chinking• First, clean the wood to take away all kinds of dirt, cobwebs, and mildew. If you want to use a pressurized washer in cleaning, make sure to use a correct setting as not to damage the logs. Let them dry for a few days before you do the stain. • Next, you can choose the stain to use. Select from semi-transparent to high quality stain and wood finish. You can also select from various colors like oak, walnut, mahogany or white pine. • Now, you can spray the stain on the log, distributing it evenly; spraying is the most effective way to do staining by the way. After the first coating, you just need to do a follow up; either by back-brushing or smoothing it with your hand. Do prepare a lot of stain mixtures so the logs will not starve for protection. • It’s better if you’ll stain in the morning so when the sun heats up, you’re already done. • You can let it dry for a couple of days before applying a second coating. You can do as many coatings as you want; as long as each coating has dried up before doing the next. Your log homes or log cabins truly provide a one of a kind place to be called as a home. You can create small log cabins to start with and later have full log houses with various designs and building plans. Though, they’re not just considered as ordinary homes; it’s because you need a careful maintenance technique to be able to preserve the beauty of your log homes. This is only done with the process of chinking.
This is your new blog post. Click here and start typing, or drag in elements from the top bar.
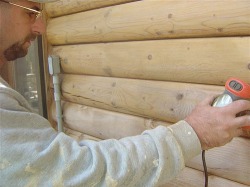
 A DIY Project is not just for homeowners like you who are trying to save on cost. Sometimes, you want to experience the hard work of chinking to make it more memorable. However, it’s not going to be difficult if you’ll follow the correct process. It will also be easier you will learn these tips. Tips for Do-It-YourselfersBefore you try chinking on your own, it would help to do a research on some of the necessary things to follow during the process. You can only start this without any guidelines if only you were once a professional with this project. If not, better follow these tips: 1) Make sure to put all your tools inside a bucket filled with water. If not in use, rinse well and dry them up. If the chinking material has dried up without being washed, it will be difficult to use these tools. 2) The best time to work is early morning or during a cool humid weather. You can also do it under shady areas. It’s difficult to do the project if you’re under direct heat of the sun because the surface will dry and break down too fast. 3) It’s better to set up a joint starting from the back corner of the closet going to its front door rather than the other way around. 4) If you’re a starter, you can use materials that come in disposable tubes. If you feel that you’re prepared enough to do the job and you have decided what color to use, this time you can order and demand for materials to be used for the entire project. You must remember it’s not called a Perma Chink without any reason. Once it’s built on walls, it stays permanently. Better do the chinking right and if there’s anything you need for help, you can always call a professional or do more research.
 There are some people in the world who want to build a log cabin with their bare hands. Some of them want to do the hammering, chinking, and caulking first-hand so that they can look at the product of their hard and laborious work someday with pride. Perhaps you are one of these people. But what happens when you find blisters forming in your chinking? These can be a nuisance to your cabin building moment, as most blisters tend to reform even when repaired. So what do you do then? You don’t have to worry much about how you apply your log chinking when blisters form, since these are usually the result of the chinking being put under direct sunlight for a prolonged period of time. Gas can build up when the chinking dries, and heat causes it to expand quickly, causing some bubble formation in between the chinking and the layer of skin that forms when the material begins to dry. So here are some things to remember in order to prevent blister formation in your chinking: First, apply the material on the shady side of the log cabin, since blisters are less likely to form in areas like this. To chink the side that is under direct sunlight, put up some shade by covering it with a cloth or anything that can prevent direct contact with sunlight. You can also attempt to “pop” the blister when it forms, and in this case, you can just push it back and reapply the log chinking in its place. But this must be done on the first day whenever possible, when the chinking and caulking is still wet in order for it to be effective. Smooth out the repaired blister a few days later, and you’ll find the blister gone and your chinking repaired.
|
 RSS Feed