A DIY Project is not just for homeowners like you who are trying to save on cost. Sometimes, you want to experience the hard work of chinking to make it more memorable. However, it’s not going to be difficult if you’ll follow the correct process. It will also be easier you will learn these tips.
Tips for Do-It-Yourselfers
Before you try chinking on your own, it would help to do a research on some of the necessary things to follow during the process. You can only start this without any guidelines if only you were once a professional with this project. If not, better follow these tips:
1) Make sure to put all your tools inside a bucket filled with water. If not in use, rinse well and dry them up. If the chinking material has dried up without being washed, it will be difficult to use these tools.
2) The best time to work is early morning or during a cool humid weather. You can also do it under shady areas. It’s difficult to do the project if you’re under direct heat of the sun because the surface will dry and break down too fast.
3) It’s better to set up a joint starting from the back corner of the closet going to its front door rather than the other way around.
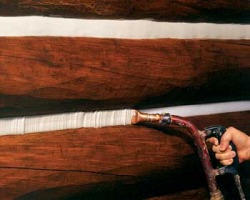
4) If you’re a starter, you can use materials that come in disposable tubes. If you feel that you’re prepared enough to do the job and you have decided what color to use, this time you can order and demand for materials to be used for the entire project.
You must remember it’s not called a Perma Chink without any reason. Once it’s built on walls, it stays permanently. Better do the chinking right and if there’s anything you need for help, you can always call a professional or do more research.
Tips for Do-It-Yourselfers
Before you try chinking on your own, it would help to do a research on some of the necessary things to follow during the process. You can only start this without any guidelines if only you were once a professional with this project. If not, better follow these tips:
1) Make sure to put all your tools inside a bucket filled with water. If not in use, rinse well and dry them up. If the chinking material has dried up without being washed, it will be difficult to use these tools.
2) The best time to work is early morning or during a cool humid weather. You can also do it under shady areas. It’s difficult to do the project if you’re under direct heat of the sun because the surface will dry and break down too fast.
3) It’s better to set up a joint starting from the back corner of the closet going to its front door rather than the other way around.
4) If you’re a starter, you can use materials that come in disposable tubes. If you feel that you’re prepared enough to do the job and you have decided what color to use, this time you can order and demand for materials to be used for the entire project.
You must remember it’s not called a Perma Chink without any reason. Once it’s built on walls, it stays permanently. Better do the chinking right and if there’s anything you need for help, you can always call a professional or do more research.
 RSS Feed